
- Fri 13 September 2024
- software
- Jason K. Moore
- #conda, #python, #scientific software, #installation
Introduction
I have been teaching scientific Python for about 15 years now and helping students install everything correctly on their own computer has not really gotten simpler for them or me. I no longer have to coach students through compiling NumPy and SciPy but that pain has now been replaced with navigating them through the myriad of package managers that all tout themselves as the solution. These days, a new package manager option seems to be released about every month.
Back when I started in 2008, I would apt install the Python scientific computing stack for simple use on Debian Linux (which still works nicely today!) and if I needed the latest package version or was contributing to the packages I used, I would compile NumPy & SciPy from source in a Python virtual environment and then install mostly pure Python packages with easy_install from PyPI (we called it "The Cheeseshop" back then). The first release of pip was in 2008 and gained quick adoption over easy_install, but it did not (and still doesn't fully) solve the scientific Python installation needs. But in 2012, Continuum Analytics Inc. (now Anaconda Inc.) released the open source Conda package manager and a website called binstar hosting Conda packages (pre-compiled binaries) with a goal to unify the bubbling scientific software packaging mess with particular focus on equal status on all three major operating systems and end users never having to compile the scientific Python stack again (among other things). I started using Conda immediately and have so since (even through the slow solver days). I've tried many of the subsequent solutions, but they all seemed to miss at least one thing that does not work with a scientific computing oriented workflow. Thus, I still believe Conda's approach is the best solution, especially since Conda Forge came into being.
Given the infinite combination of options for installing and setting up your scientific Python oriented project development environment, I will stick to a single (opinionated and "simple") approach. This approach has worked for me for over a decade. Of course, you can piece together a solution that works for you and fits your style, but this hopefully gives a clear starting point for at least my students.
Setup Conda with Conda Forge
We first need Conda. There are various ways to install Conda, but I recommend to install Miniforge due to its small size and that it defaults to installing packages only from Conda Forge. Miniforge creates a directory that will house all of your installed software that does not need administrator privileges. It also only installs packages from Conda Forge that are sure to be compatible. Download Miniforge for your operating system and computer architecture here:
https://conda-forge.org/download/
For Linux and Windows you most likely need the x86_64 build and for MacOS you will need to choose the x86_64 for old Macs with Intel chips and arm64 for new Macs with Arm chips. Follow the installation instructions on the page or the more detailed version in the README here:
Base Conda Environment
Conda has a "virtual environment" feature builtin which allows you to install a set of packages isolated from another set of packages. The "base" environment is the default environment and I use this environment as my general calculator, so it should have the most common packages that I use. After installing these common packages, this gives you something akin to Matlab where the latest version of everything you use is importable or you can think of it as your custom built Python distribution. You will find recommendations on the internet discouraging from installing packages in the base environment, but I've never had any issue doing this over the last decade.
You interact with Conda via the command line, so open a terminal on Linux or Mac or open the Miniforge command prompt on Windows. Conda's base environment should be activated by default. I use the $ below for the command prompt symbol, this will be different on Windows or if you have customized it.
Check if Conda is installed by typing and pressing the enter key:
$ conda --version
This should return a version number, e.g.:
conda 24.7.1
Now install any packages that you think you may regularly use, e.g.:
$ conda install numpy scipy matplotlib sympy ipython spyder
The package names have to match the names of available Conda Forge packages found here:
https://conda-forge.org/packages/
After the installation finishes, you can use these packages, e.g.:
$ python -c "import numpy; print(numpy.ones(5))"
[1. 1. 1. 1. 1.]
If you prefer working in an Integrated Development Environment (IDE) you can do so. Spyder is a possible choice, which I installed above. You can open Spyder via your application menu or by typing this at the command line:
$ spyder
There are many IDE choices and most popular ones work seamlessly with Conda and Conda virtual environments.
This setup may serve all of your needs and you can use the single set of packages installed in the base environment. You can periodically run these commands:
$ conda update --all
$ conda clean --all
to keep your packages all at their latest compatible versions and delete versions of packages that are no longer in the base environment.
Project Conda Environments
At some point you may want a specific set of packages at specific versions for a project, paper, collaboration, etc. and these will likely be in conflict with what you have installed in your base environment. For every specific project I work on, I create a Conda virtual environment with the subset of packages I need for that project. I first create a directory/folder on my computer for the project that, in its most basic form, looks like:
/home/moorepants/myproject/
|--> myproject-env.yml
|--> script.py
where the script.py file would house some analysis for the project and myproject-env.yml is a Conda environment.yml file that specifies the software needed to run script.py. A real project will have many more files, for example here is one of my working repositories for a manuscript:
https://github.com/moorepants/bicycle-steer-control-paper
myproject-env.yml should have contents that look something like this:
name: myproject
channels:
  - conda-forge
dependencies:
  - bicycleparameters
  - dynamicisttoolkit
  - ipython
  - matplotlib
  - numpy
  - opty
  - pip
  - python ==3.10  # you can specify versions
  - scipy
  - spyder-kernels  # allows access to this environment in spyder installed in base
  - sympy
  - yeadon
All packages in the dependencies: list have to correspond to packages available on Conda Forge, listed here:
https://conda-forge.org/packages/
You can learn more about the environment.yml file specification in the Conda documentation:
https://docs.conda.io/projects/conda/en/latest/user-guide/tasks/manage-environments.html
This environment file can be used by you or others to reproduce a software installation for your project.
Once you save the file, you can create the environment with this command:
$ conda env create -f myproject-env.yml
To use the environment, you have to activate it in the terminal/command prompt:
$ conda activate myproject
Now you'll have access to that set of packages by default, for example we see that the matching Python version is installed:
$ python --version
Python 3.10.0
We installed Spyder in the base environment and spyder-kernels in the project's environment. If we type spyder, the Spyder installed in base will open (because we didn't install in the project environment). But when you open Spyder you can select this project environment to run the code. Jupyter, VScode, Pycharm, and many IDEs will allow you to select the Conda environment.
To do so in Spyder, choose your environment from the "Consoles -> New Console in Environment" menu:
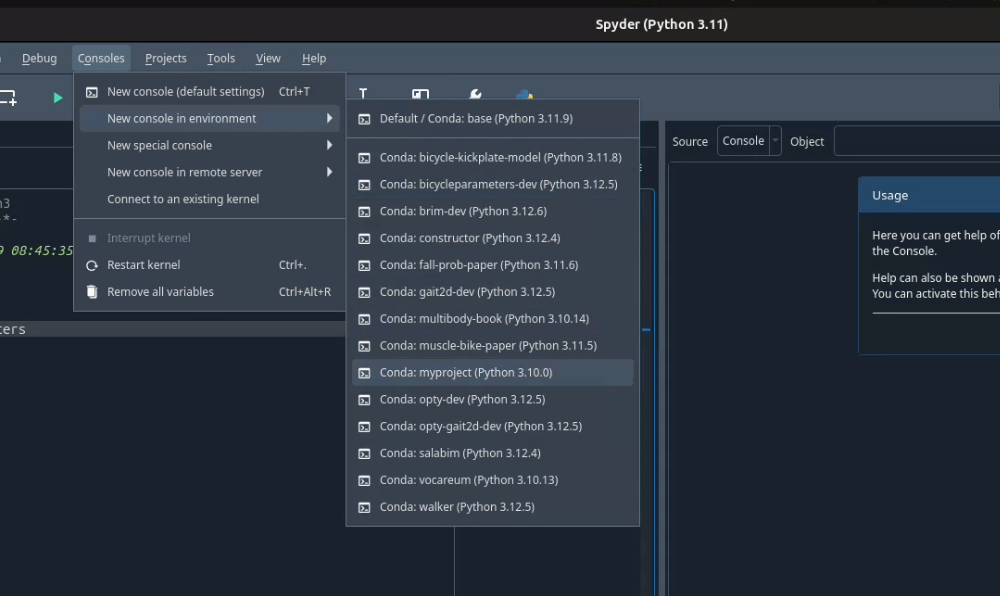
You can select any conda environment to power a new console. That console will then be used to run your scripts and for interactive computing.
After the new console is available, your script will run using that environment:
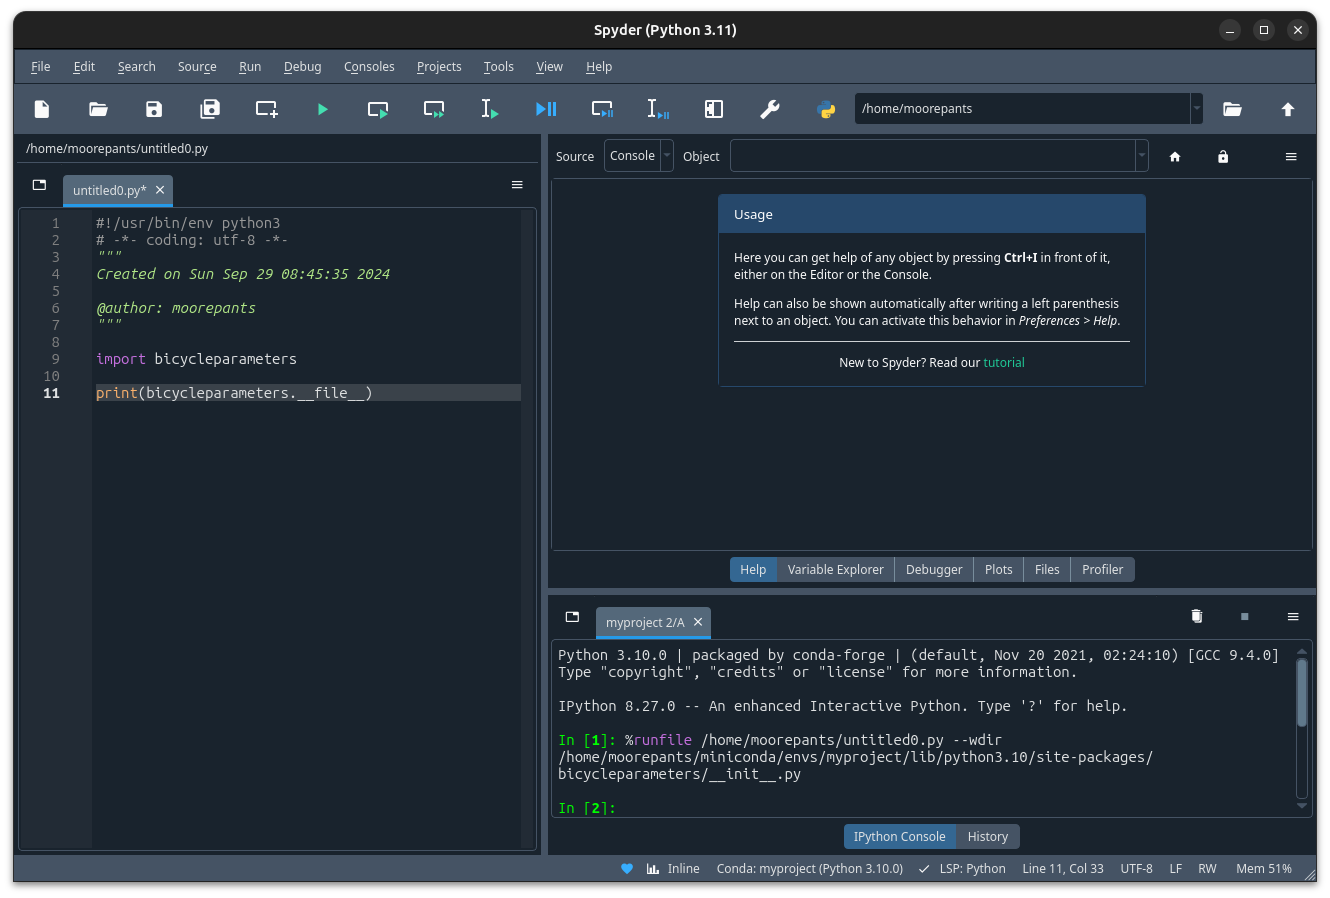
The bicycleparameters package is imported from the correct environment.
If you want to set an environment to be used for all new consoles, first activate your environment in the terminal/command prompt and find the full path to the Python executable associated with the environment by typing:
$ python -c "import sys; print(sys.executable)"
This should display a path to the correct environment directory/folder corresponding to your active environment, for example mine displays:
/home/moorepants/miniforge/envs/myproject/bin/python
Now, open Spyder and find the preferences that let you set the Python interpreter. You should find this under this menu path: "Tools -> Preferences -> Python interpreter -> Use the following Python interpreter". Paste the path from the prior command line command into this field and apply the preferences. New and restarted Spyder consoles will execute code in your project environment. See this blog post for more information:
If you are using version control (which you should be), commit the myproject-env.yml file to the repository so others can reproduce your project environment.
Package Not in Conda Forge
At some point you will want to use a package that is not available in Conda Forge. There are different approaches to install the package in your Conda environment depending on what the package's primary programming language is, but most commonly you will want a Python package that you can find on PyPI but not in Conda Forge. Packages on PyPI are generally installed using the pip package manager. You will see many other recommendations on the web, e.g.: pipx, hatchling, poetry, pdm, uv for installing PyPI pacakges. It is best to ignore these for now and you can use them later if you find you like them better than pip and/or Conda.
You can install packages from PyPI into a Conda environment but this arrangement is fragile and you should never install packages with pip into your base environment (otherwise you are asking for trouble). The safest approach I have found over the years is to first install everything the PyPI packages depend on using Conda and then install the PyPI package using pip's with its --no-deps flag. This prevents pip from filling your Conda environment with PyPI packages you don't want there.
As an example, SymPy is availabe on Conda Forge but we will pretend that it isn't and install from PyPI. SymPy's only required dependencies are Python and mpmath. Both are available on Conda Forge. So we create an environment file that includes pip in the dependencies list so we can use it to install from PyPI inside the environment and the two dependencies of SymPy:
name: myproject
channels:
  - conda-forge
dependencies:
  - pip
  - python
  - mpmath
$ conda env create -f myproject-env.yml
$ conda activate myproject
Now, you can run pip inside the Conda environment to install the PyPI package for SymPy:
$ python -m pip install --no-deps sympy
If you now look at the list of installed packages you see that SymPy is listed as installed from PyPI:
$ conda list
# packages in environment at /home/moorepants/miniforge/envs/myproject:
#
# Name                    Version                   Build  Channel
_libgcc_mutex             0.1                 conda_forge    conda-forge
_openmp_mutex             4.5                       2_gnu    conda-forge
bzip2                     1.0.8                h4bc722e_7    conda-forge
ca-certificates           2024.8.30            hbcca054_0    conda-forge
ld_impl_linux-64          2.40                 hf3520f5_7    conda-forge
libexpat                  2.6.3                h5888daf_0    conda-forge
libffi                    3.4.2                h7f98852_5    conda-forge
libgcc                    14.1.0               h77fa898_1    conda-forge
libgcc-ng                 14.1.0               h69a702a_1    conda-forge
libgomp                   14.1.0               h77fa898_1    conda-forge
libnsl                    2.0.1                hd590300_0    conda-forge
libsqlite                 3.46.1               hadc24fc_0    conda-forge
libuuid                   2.38.1               h0b41bf4_0    conda-forge
libxcrypt                 4.4.36               hd590300_1    conda-forge
libzlib                   1.3.1                h4ab18f5_1    conda-forge
mpmath                    1.3.0              pyhd8ed1ab_0    conda-forge
ncurses                   6.5                  he02047a_1    conda-forge
openssl                   3.3.2                hb9d3cd8_0    conda-forge
pip                       24.2               pyh8b19718_1    conda-forge
python                    3.12.5          h2ad013b_0_cpython    conda-forge
readline                  8.2                  h8228510_1    conda-forge
setuptools                73.0.1             pyhd8ed1ab_0    conda-forge
sympy                     1.13.2                   pypi_0    pypi
tk                        8.6.13          noxft_h4845f30_101    conda-forge
tzdata                    2024a                h8827d51_1    conda-forge
wheel                     0.44.0             pyhd8ed1ab_0    conda-forge
xz                        5.2.6                h166bdaf_0    conda-forge
If you carefully install all of the PyPI packages' dependencies from Conda Forge then you can reasonably safely run conda update --all inside the Conda environment and then follow that with a python -m pip install --no-deps -U sympy to upgrade the PyPI package.
This method will generally work but it requires you to manually determine and install the dependencies. If you have many PyPI packages, then this may get out of hand to manage. But my experience is that you typically don't have many PyPI packages you need that are not on Conda Forge.
Conda does also support specifying PyPI packages in the environment file like so:
name: myproject
channels:
  - conda-forge
dependencies:
  - pip
  - python
  - mpmath
  - pip:
    - sympy
but the --no-deps flag is not called when installing the packages in the pip list and you may end of up with many PyPI packages in your Conda environment and then updating things becomes more difficult, or even impossible. The nice thing is that you can always delete the environment and recreate it if it goes awry.
There are new developments to make this work more seamlessly, for example see https://github.com/conda-incubator/conda-pypi. But the ideal solution is that you help contribute to Conda Forge and add the PyPI package you need via a pull request to https://github.com/conda-forge/staged-recipes. It is generally pretty straight forward to use the grayskull tool grayskull pypi package-name to generate the recipe for a pull request if the package is a pure Python package.
Developing a Package in Your Environment
Sometimes you may want to use the development version of a software package in your environment and you may even be developing it alongside the source code for your project. Then you want to setup your environment with a "development installation" of one or more packages. This approach is almost identical to the prior section, except you will install the package from the source code you have cloned from a Git repository. In our lab it is be (or should be) common to develop DynamicistToolKit alongside the code for a research project so I'll use this as an example.
First, check the development dependencies of DynamicstToolKit, which can be found in the setup.py file in the source repository:
https://github.com/moorepants/DynamicistToolKit/blob/master/setup.py
To develop this package you should have numpy, matplotlib, scipy, sphinx, numpydoc, and pytest installed. So, include these in your project environment configuration file:
name: myproject
channels:
  - conda-forge
dependencies:
  - matplotlib
  - numpy
  - numpydoc
  - pip
  - pytest
  - python
  - scipy
  - sphinx
$ conda env create -f myproject-env.yml
$ conda activate myproject
Now, clone the development version of DynamicistToolKit with Git and navigate into the new directory:
$ git clone https://github.com/moorepants/DynamicistToolKit.git
$ cd DynamicistToolKit
Now make a development installation from this directory with Conda:
$ conda develop .
Update (2024-09-29)
After demoing this at a lab meeting, I tried to use conda develop . with BRiM and it failed to work. The reason is twofold: 1) BRiM uses a nontraditional arrangement of files in the package, i.e. brim/src/brim, and 2) conda develop only seems to add the path of the . directory to the the Python path instead of actually installing the package. So, instead of conda develop I change my recommendation to use:
$ python -m pip install --no-deps --editable .
which will actually install the development package.
When you import dtk you should see that it is sourced from the file in the Git repository you cloned:
$ python -c "import dtk; print(dtk.__file__)"
/home/moorepants/src/DynamicistToolKit/dtk/__init__.py
Now you can make edits to the files in the DynamicistToolKit directory and those changes will be present when you import the package in your project Conda environment. You can use Git to keep the development version of DynamicistToolKit up-to-date and a Git branch to manage your changes. Updating the environment has the same perils as mentioned in the previous section but works fine if the development installs sit at the top of the dependency stack.
Extra Tips and Notes
- There are so many ways to get a working scientific (Python) stack of software installed and it is unbelievably confusing when you try to figure it out for the first time because every website tells you a different approach. It is unfortunately the nature of the beast. My best advice is to find a real person that's familiar with it and let them help you get set up.
- The above method does not give you long term reproducibility, i.e. running conda env create -f myproject-env.yml in ten years will inevitably fail even if you hard pin the package versions. But this approach generally works in the time frame of a project, like 1-4 years. If you want more long term reproducibility of environments, you'll need to learn about Conda lock files or even other more appropriate tools.
- You can find things like: https://github.com/conda-incubator/conda-project which try to encapsulate what I show above in fewer commands with a wrapper tool and to also incorporate Conda lock files.
- pip and the related tools have come a long way in the last 15 years, so you may be able to get away with only using packages directly installed from PyPI, but the second you need a package that the PyPI paradigm does not support, you have to move back to more general package managers, like Conda. You can read about the fundamental flaws the PyPI approach has here: https://pypackaging-native.github.io/ if you want to know the gory details. My opinion is that Conda is still the more full proof approach for a scientific software setup for our general use cases.